
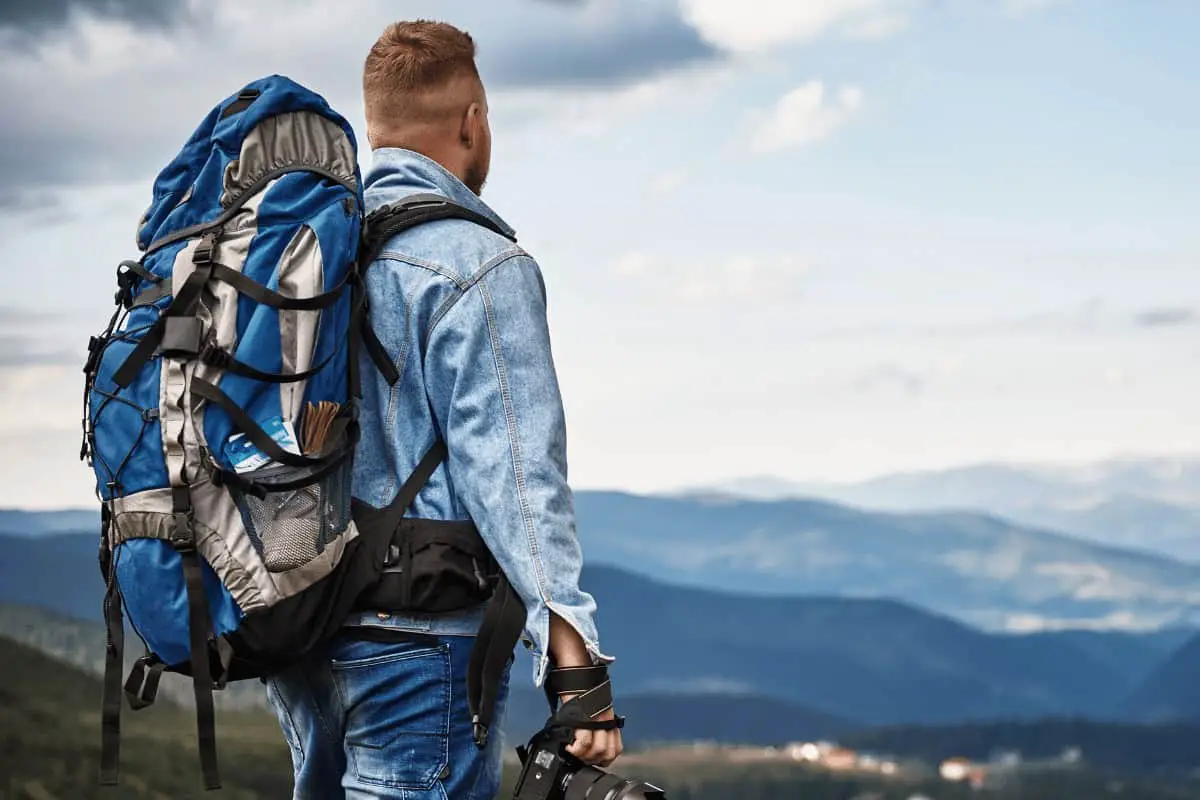
Hiking is a great way to spend time outdoors. The only downside is that you need to be prepared for everything it might throw at you, including sudden weather changes or an overgrown trail. One important thing you will want to carry with you on your hike is your camera! How to safely carry your camera while hiking? This is the question in this post.
The best way to carry your camera while hiking is to use the strap that comes with it. If you do not have a shoulder strap, you can attach the camera to one of the other items in your backpack. Remember to secure the straps so they will not get caught or lost when hiking.
If you are using a point-and-shoot camera, then it might be easier to just put it in the outside pocket of your backpack. Keeping the camera in an outside pocket means that it will stay loose and can easily fall out if you flip it upside down. It also means that the weight is offset by the rest of your pack rather than resting on one shoulder as a sling bag or strap would.
Best Tips to Safely Carry Your Camera While Hiking
Use a Dry Bag
Another great way to protect your camera while hiking is to use a dry bag. A dry bag is a watertight bag that will keep your camera safe and dry in any weather conditions. You can find different sizes and levels of water protection, so be sure to choose the right one for your needs.
Using a dry bag is a great way to keep your camera safe and protected while hiking, especially if you are expecting bad weather or if the trail is overgrown.
Wear a Camera Strap
Wearing a camera strap is the best way to keep your camera safe while hiking. The strap will help to distribute the weight of the camera evenly across your shoulders, which will help to prevent neck and shoulder pain. Make sure to secure the straps so they will not get caught or lost when hiking.
Get a Waist Bag
A waist bag is a great way to carry your camera while hiking. The bag will help to distribute the weight of the camera evenly across your stomach and hips, which will help to prevent back pain. Waist bags come in many different sizes, so be sure to choose the right one for your needs.
Use a Shoulder Harness
Using a shoulder harness is a great way to carry your camera while hiking as well… The shoulder harness will help to distribute the weight of the camera evenly across your shoulders. Make sure to secure the straps so they will not get caught while hiking.
Wear a Camera Backup
Wearing a camera backup is a great way to protect your camera while hiking. The backup will help to protect your camera in the event that it falls or is damaged. The backup can also be used to store extra memory cards and batteries.
Attach the Camera to Your Bag
There are many different types of camera backups available on the market. Be sure to choose the one that is right for you. Some of the most popular backups include wrist straps, pouches, and belt clips.
If you are not using a shoulder strap, you can attach the camera to one of the other items in your backpack. Remember to secure the straps so they will not get caught or lost when hiking.
How Do You Pack a Camera in A Hiking Bag?
I pack my camera in a Ziploc bag, then I put it in a side pocket of my Altra pack. So far, the camera has been safe from getting wet or damaged while hiking with this setup. Lots of tips and tricks so pack how it feels most comfortable for your needs.
More Ways to Carry a Camera While Hiking
I also carry my camera in an old North Face lens case. It’s lightweight and easy for me to attach it on the outside of my pack with carabiners or bungee cords, but this does make it more susceptible to getting wet if hiking in inclement weather conditions.
How Do You Carry a Dslr on A Trek?
DSLRs are large, robust cameras that can be a little too big to carry around while hiking. However, with the right precautions, you can safely carry your camera with you on your trek.
One way to carry a DSLR on a trek is to use a camera backpack.
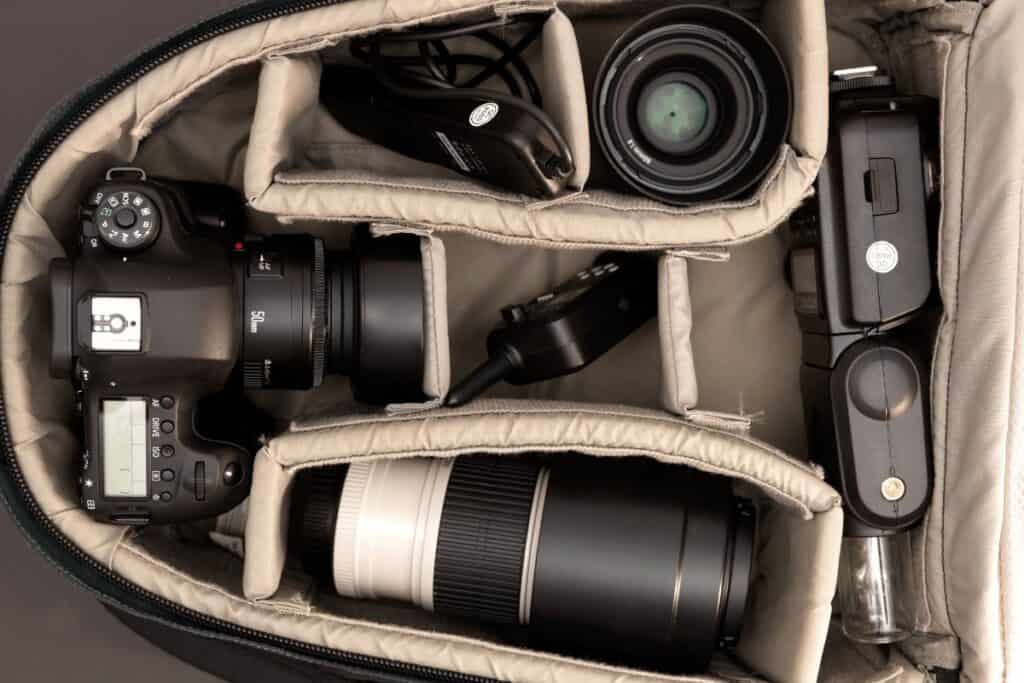
Camera backpacks come in many different sizes and styles, so you can find one that’s perfect for your needs. They typically have room for your camera, lenses, and other gear, as well as straps that distribute the weight evenly across your body. This makes them comfortable to wear for long periods of time.
Another option is to use a shoulder strap camera bag. These bags attach directly to your shoulder and often have a section for your camera
How do you carry a gimbal when hiking?
One way to carry a gimbal while hiking is to put it in a backpack. You can also attach it to your belt or put it in a pocket. Another option is to use a shoulder strap. You can also put the gimbal in a case or wrap it in a cloth. Whichever way you choose, make sure that the camera is secure and will not fall out.
Another important factor to consider when hiking with a camera is weight. Make sure that your equipment does not weigh down your pack too much. Also, try to find a lightweight gimbal if possible. This will help reduce fatigue while hiking.
Finally, always be aware of your surroundings when hiking with a camera. Keep an eye out for potential hazards such as cliffs, rocks, and other obstacles. By being careful and using the right gear, you can safely take pictures while hiking!
How do you safely carry a camera?
A lot of people don’t think about how to safely carry a camera while hiking because the weight of the camera is not really an issue. If you are carrying your DSLR with a lens, it can be very heavy even if you are just going for a short hike.
The best way to carry a camera while hiking is to make sure that you have it in hand at all times and never place it near your backpack or strapped to your chest.
How do you carry a tripod when hiking?
If you are hiking with a group, it’s easier to carry the tripod in its case on your back. If you’re on your own, consider carrying it in one hand while holding on to something stable.
If you haven’t considered that the camera will be pointing down when using filters like ND (Neutral Density) grads or polarized, then plan ahead by adding a loop strap to the bottom of the lens for a safer way of attaching it.
Since these lenses typically have long focal lengths and high magnification ratios, their center of gravity is closer to the camera body – making them more unwieldy than others – but if they fall from an upright position onto flat ground or water, there’s less chance of damage.
How do you carry your camera around?
The best thing to do is purchase a camera bag that has loops. Attach the loops on the velcro on your backpack and then put your camera around, across, or around whichever shoulder you want to carry it on.
If you don’t have a good bag, consider getting one with two straps (keep one hand free) or use an old piece of cloth like an old shirt on your front for better grip – keep in mind not to apply any pressure, as this might damage the lens!
Protecting your Camera & Making it Easily Accessible
One of the most important things you want to do when carrying your DSLR is to protect it from bumps and scratches. You have a few options for protection-you can use a camera bag, buy a manufacturer-made product for this purpose, or make one yourself.
Whatever option you choose, the goal is to safely transport your camera while still making it accessible.
A camera bag is an obvious choice for protecting your camera. The drawback with this option is that you have to worry about having enough space for gear inside the bag which can be impractical if you are hiking in remote areas where backpacking space becomes limited.
Camera bags typically come in two sizes: small and large. I prefer using a small size, but my backpack is large enough to fit most small bags.
A camera bag also takes up time when you need access to the gear inside, so I recommend using it only if you are car camping or will be taking breaks during your hike where there is more room for storage.
If you want to go with a manufacturer-made product, I highly recommend picking up an OP/TECH USA Rainsleeve.

This is what I use on my hikes and rain does not get in at all! The material feels like thin neoprene–it’s soft but still durable.
These run about 15 dollars each which can add up over time depending on how many cameras you own (I have one per DSLR).
You could even make your own version of these
Storing Your Camera
If you’re just storing your camera, you should store it in a dry, warm place while it’s not being used. The best way to store a camera is to keep it in a camera bag. The strap of the camera bag should always be securely fastened to your body or to your daypack/backpack so that you don’t have the camera swinging around and hitting things.
You should also avoid storing your camera with anything else without checking if they will be okay together.
For example, you wouldn’t want to store a metal object next to the lens of your camera because it could cause magnetization or create electrical charges which could destroy your lenses.
Waterproofing Your Camera
If you’re looking for a way to waterproof your camera, there are a few different methods that you can use. One option is to use a waterproof case. Another option is to use zip-lock bags. And the third option is to use a dry bag.
If you’re looking for a way to keep your camera safe from scratches, there are also a few different methods that you can use. One option is to use a camera bag. Another option is to use lens hoods. And the third option is to use UV filters.
If you’re looking for a way to keep your camera warm, there are also a few different methods that you can use. One option is to use hand warmers. Another option is to use thermal wraps.
Best Camera Straps for Hiking
When looking for the best camera straps for hiking, there are a few things you need to consider. The strap needs to be comfortable, durable, and secure. Here are some of the best straps for carrying your camera while hiking.
The Black Rapid Camera Strap is one of the most popular options for hikers. It is comfortable and adjustable, and it also has a built-in security system that prevents your camera from falling off the strap.
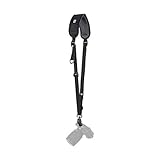
The Y8HM Camera Shoulder Strap with Quick Release Buckle is another great option for hikers. It is comfortable and lightweight.

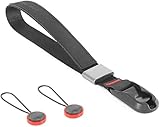
The Peak Design Cuff Camera Wrist Strap is a great option for hikers who want to keep their hands free. It is comfortable and adjustable, and it also comes with a built-in tripod mount.
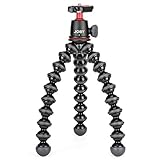
The Joby Gorilla SLR Zoom Camera Tripod is perfect for hikers who want to have more control over their cameras. It is lightweight and portable, and it can be attached to virtually any surface.
No matter what strap you choose, make sure that it is comfortable and durable enough to withstand the demands of hiking. And always remember to practice safe handling techniques when carrying your camera in the wild!
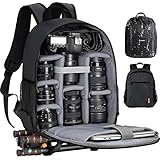
Best Hiking Camera Backpacks
When looking for the best hiking camera backpack, it’s important to consider how you will be using it. Some backpacks are designed specifically for carrying a camera, while others are more general-purpose backpacks that can also carry a camera.
Some features to look for in a hiking camera backpack include:
-A protective case or shell for your camera
-Enough space to store all of your camera gear
-A comfortable fit, so you can wear it for long periods of time
-Waterproofing and other weather protection features
Here are some of our favorite hiking camera backpacks:
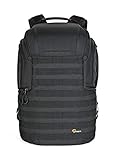
1. Lowepro Protactic 450 Aw Camera Backpack
2. Tamrac Expedition 7x Photo/Computer Backpack

-The Lowepro Protactic 450 AW Camera Backpack is a great option for hikers who want to carry their camera with them on the trail. It features a hardshell case that provides protection from bumps and scratches, as well as enough space to store your camera gear, including lenses and a laptop.
The backpack also comes with a variety of straps and pockets that allow you to customize the fit and storage capacity, making it comfortable to wear for long periods of time. And finally, it’s waterproof and weatherproof, so you can rest assured that your gear will be safe even in bad weather conditions.
-If you’re looking for something a little smaller, the Tamrac Expedition Photo/Computer Backpack is a great choice. It’s an excellent option for hikers who already have their camera gear, but want to carry it on the trail with them in order to capture some unique shots along the way.
This backpack has plenty of space inside for all your hiking essentials as well as enough room to store up to two DSLR cameras and five lenses or one laptop computer.
-The Lowepro Protactic 450 AW Camera Backpack is a fabulous backpack a little bit more expensive
-The Tamrac Expedition Photo/Computer Backpack may be more in your budget and very good as well.
Tips for Hiking with A GoPro
If you’re like me, then hiking with a camera is something that you’re probably no stranger to. As someone who likes hiking and mountain climbing, I take my DSLR with me to capture the beauty of nature and to get some great shots of our family while we’re on the trail.
I sometimes also like to film and take photos while hiking and this can be a challenge if your camera isn’t waterproof – which mine thankfully is! With so many great benefits of using a GoPro for hiking, it’s definitely one of my favorite ways to capture memories from our hikes together.
1) Get a good mount: Getting the proper mount for your camera is crucial in order for it not to fall or move while you’re climbing. For my GoPro, I use the chest mount because it keeps the camera in front of me and at eye level so that I can see what’s going on behind me but also get great footage up ahead.
A great benefit to using a GoPro is that they are waterproof – which makes it perfect for getting video underwater when snorkeling!
However, if your GoPro isn’t waterproof then there are several other mounts available such as head straps/mounts, wrist straps, handlebar, etc., just make sure you choose one wherever you plan to hike (forest trails vs. mountains) since different locations require different types of equipment for them not to fall off.
If you’re not using a GoPro, any camera can be mounted onto a tripod which is also another great option if you don’t want to worry about it falling or being damaged while hiking.
Tripods are available in different sizes and weights so that you can choose the one that best suits your needs and hiking style.
Tips for Safely Hiking with Your Camera Gear
-Always use a mount when carrying your camera around, whether it’s for a DSLR or GoPro – this will help ensure that it doesn’t fall and get damaged.
Final Thoughts
I hope his blog post has given you tips for carrying your camera while hiking. Whether it’s a DSLR or GoPro, make sure to use the right mount so that it doesn’t get damaged and falls off during hikes.
If you’re not using a waterproof one then there are other mounts available such as head straps/mounts, wrist straps, etc., just choose one best suited for wherever you plan to hike (forest trails vs. mountains.
Hopefully, this blog post has helped you learn how to safely carry your camera while hiking! Thank you for reading! 🙂